The forks are rebuilt, tail section reinstalled, master cylinder installed, new pads on brakes... lots done. All that is left (I think) is to put the tank and body parts on, seat, double check everything and go for a ride!
Bleeding the brakes was a pain in the ass. I ended up buying a Mityvac bleeder (special tool for bleeding [getting all the air out] brakes) and it took five minutes.
Just remembered... need to lube the cables and hook up the clutch too.
Got my plates today. Its all registered and legal and ready to go. Oh oh... one more thing... have to work out something to mount the license plate. The original is bent and missing parts.
See why this stuff ends up taking so long?
Friday, March 27, 2009
Tuesday, March 17, 2009
IT'S ALIVE!!! IT'S ALIVE!!!
After five months monkeying around and rebuilding the top end, painting, tweaking, checking and everything else... after two weeks of tinkering and playing trying to get it to startup tonight was magic time! It didn't want to start and as I fiddled trying to get it going my finger covered a small hole in the rear head... viola! Its the vacuum line that is supposed to connect to the fuel tank. I popped a screw in there and POW all at once.
Bare witness...
In the vid you can see my temporary fuel tank solution. The actual tank only works with vacuum supplied via the hole I plugged. I'm waiting on a fitting to connect the hose (I broke the original). Till then the temp tank is the setup de jour.
Now just need to do the fork seals, install my new-to-me clutch lever, new hand grips and all the odds and ends and she is ready for the road.
Wednesday, March 4, 2009
Another Prickley Pearch
I was up till midnight again last night working on the beast. It started well. I got the hole tapped for the coil mount and got that all installed.
The problem came when I decided to put the new clutch lever on. I couldn't get it off the perch. The screw head is huge and my regular screwdriver kept slipping out. Oh and it's seized. I ended up pulling the whole perch/lever which necessatated my pulling the electrical box under the headlight and getting the left handlebar switches unhooked and removed from the bar. Oh that required unbolting the handle bar because there wasn't enough slack to slide electrical stuff off. CAN OF WORMS!!!
I present to you the carnage:
Then I spent a bunch (too much) time at the bench vise trying to convince the big screw it needed to come out... here is the big screw:
That didn't work so I flipped it over and cut off the remaining screw and tried to drill it out. (been doing that a lot lately) but the bit started to wander off the steel bolt and onto the aluminum parts (bad) so I stopped and here is where it rests:
I finally gave up and went inside to hit the Internet and see if I could just buy the part... NO! I's unique to the Ascot and not cheap new (if available) and I didn't find any used (ebay). Then it hit me this am... Its a screw that goes through the handle and has a bolt on the other side. I don't think it is "screwed" to the handle I'm trying to remove... I think it's pressed in. I should be able to hammer or press it back out. I'm going to put this to the Ascot Yahoo group to see what they wizards there say. Stay tuned...
As usual pics on the Picasa Page. (new ones start here)
 |
| From Ascot |
The problem came when I decided to put the new clutch lever on. I couldn't get it off the perch. The screw head is huge and my regular screwdriver kept slipping out. Oh and it's seized. I ended up pulling the whole perch/lever which necessatated my pulling the electrical box under the headlight and getting the left handlebar switches unhooked and removed from the bar. Oh that required unbolting the handle bar because there wasn't enough slack to slide electrical stuff off. CAN OF WORMS!!!
I present to you the carnage:
 |
| From Ascot |
Then I spent a bunch (too much) time at the bench vise trying to convince the big screw it needed to come out... here is the big screw:
 |
| From Ascot |
That didn't work so I flipped it over and cut off the remaining screw and tried to drill it out. (been doing that a lot lately) but the bit started to wander off the steel bolt and onto the aluminum parts (bad) so I stopped and here is where it rests:
 |
| From Ascot |
I finally gave up and went inside to hit the Internet and see if I could just buy the part... NO! I's unique to the Ascot and not cheap new (if available) and I didn't find any used (ebay). Then it hit me this am... Its a screw that goes through the handle and has a bolt on the other side. I don't think it is "screwed" to the handle I'm trying to remove... I think it's pressed in. I should be able to hammer or press it back out. I'm going to put this to the Ascot Yahoo group to see what they wizards there say. Stay tuned...
As usual pics on the Picasa Page. (new ones start here)
Tuesday, March 3, 2009
Low work weekend
I didn't get much done this weekend on the Ascot. Merry had a mom/daughter day Saturday, and we went out Saturday night. Sunday we watched a friend's kids and then they and another couple came over in the eventing. Basically nothing happened. Monday night was my first go at it this weekend.
I got the carbs on and installed the plugs (I had the old plugs in for the painting). I got a bolt at the hardware store to put in the newly tapped hole that supports the sub frame and right foot peg. It's getting pretty close. I'm planning on logging some hours this weekend. The last parts I have on order are packing that go in the exhaust. Two where the header pipes connect to the middle thing (like a big muffler) and one where the muffler connects to the middle thing. They should be in this week so if all goes well the Ascot should run this weekend.
Oh, I got my new brake and clutch levers in too. They are great looking! I'm really impressed. Only $21 including shipping on ebay! So once the motor is running I still have the fork seals and master cylinder to rebuild then get all the i's dotted and all the t's crossed. Then I can start looking into body paint.
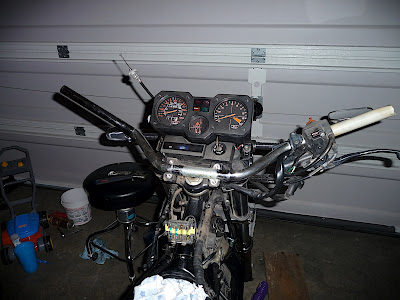
While poking around at the bike I began to think the handle bars aren't stock. they are a little high angled and they kick out a bit. You can kind of see what I'm talking about in this shot. I obviously haven't ridden it yet so I don't know if they are uncomfortable but they don't look it.
They should look more like this. You can see these turn almost 90 degrees and then another 90 to where the grips and switches are. Looks like a more comfortable upright bar and that's what I like.
I got the carbs on and installed the plugs (I had the old plugs in for the painting). I got a bolt at the hardware store to put in the newly tapped hole that supports the sub frame and right foot peg. It's getting pretty close. I'm planning on logging some hours this weekend. The last parts I have on order are packing that go in the exhaust. Two where the header pipes connect to the middle thing (like a big muffler) and one where the muffler connects to the middle thing. They should be in this week so if all goes well the Ascot should run this weekend.
Oh, I got my new brake and clutch levers in too. They are great looking! I'm really impressed. Only $21 including shipping on ebay! So once the motor is running I still have the fork seals and master cylinder to rebuild then get all the i's dotted and all the t's crossed. Then I can start looking into body paint.
While poking around at the bike I began to think the handle bars aren't stock. they are a little high angled and they kick out a bit. You can kind of see what I'm talking about in this shot. I obviously haven't ridden it yet so I don't know if they are uncomfortable but they don't look it.
They should look more like this. You can see these turn almost 90 degrees and then another 90 to where the grips and switches are. Looks like a more comfortable upright bar and that's what I like.
Friday, February 27, 2009
Grey...
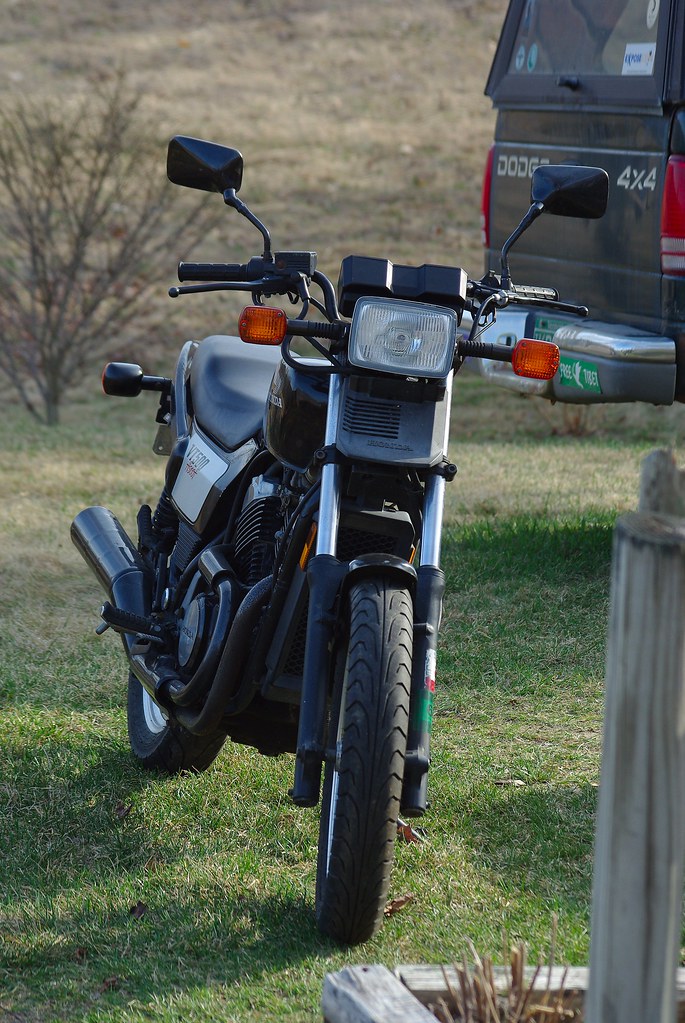
I guess someone had the same idea as me.

I like the look of this and it makes me lean (get it?)grey. I think it would be even nicer with my blacked out motor. Now if I can get a hold of a fairing from a VT500E I'll be in grey-t shape! (See what I did there?)


I like the look of this and it makes me lean (get it?)grey. I think it would be even nicer with my blacked out motor. Now if I can get a hold of a fairing from a VT500E I'll be in grey-t shape! (See what I did there?)

Wednesday, February 25, 2009
Cycle Gear
I went to Cycle Gear yesterday to kill some time while I was waiting for Merry and the kids. I wasn't that impressed. I mean if you are looking to spend a bunch of money on apparal or you are crazy for motorcross it might be your thing. Not me. The only thing there of interest to me is the LED licence plate bolts. My stock plate mount is pretty shot so I'll probably have work something else up and these are pretty cool.

I'm also thinking about some flashing brake light accessory to be extra visible. Especially consisdering the fact that I was rear ended in my car a month ago. These are pretty cool but I'd like some thing that flashes 3 or 4 times the goes steady. I don't want it flashing the entire time I'm at a red light for example.

They have a little video too... it's kind a dorky but you get the idea.
I'm also thinking about some flashing brake light accessory to be extra visible. Especially consisdering the fact that I was rear ended in my car a month ago. These are pretty cool but I'd like some thing that flashes 3 or 4 times the goes steady. I don't want it flashing the entire time I'm at a red light for example.
They have a little video too... it's kind a dorky but you get the idea.
Nothing new last night
Well I didn't work on the Ascot last night. Only vegged in front of the TV. I thought about getting the carbs on but it was later than usual for me to start and I didn't get much sleep the night before so I decided to veg for a while then go to bed.
The only real new content I have to offer is the question of color. I don't think I'll be painting the tank and other parts for a while but I have still been thinking about paint. Of course there are the two standard colors for this bike; red and black. But since I have not been doing a restoration but rather a revival (read the title of this blog!) I have felt a little latitude in how things look in the end. This is why I blacked out the motor.
So in the vein of color I was tossing around two main contenders: Atomic Orange and a deep grey.
The grey would probably be easier and cheaper since I would use a thick grey paint with no metalic or anything. Jut a shiny grey to contrast all the black on the bike. Here is a non-artists rendering of what this might look like.

The orange I am thinking of on the other hand is a deep burnt orange that is best summed up by the Corvette color Atomic Orange as seen here.

The reason I included the shot of the vette is clear once you look at my non-artists rendering of the Ascot in orange... you have to imagine all the tangerine parts as the vette color above.

So the Atomic Orange would probably be harder to paint but is more unique and makes hte bike stand out a little better (read safety). However the grey is more subdued and would probably be cheaper (non metallic) and easier (non-metallic).
Since I probably won't do any paint work (prep yes paint hell no!) till the summer (read my posts about the paint booth, garage, smell etc) I have put up a poll open till the fourth of July asking what color it should be. Let me know. And I may (or not) use your advice.
The only real new content I have to offer is the question of color. I don't think I'll be painting the tank and other parts for a while but I have still been thinking about paint. Of course there are the two standard colors for this bike; red and black. But since I have not been doing a restoration but rather a revival (read the title of this blog!) I have felt a little latitude in how things look in the end. This is why I blacked out the motor.
So in the vein of color I was tossing around two main contenders: Atomic Orange and a deep grey.
The grey would probably be easier and cheaper since I would use a thick grey paint with no metalic or anything. Jut a shiny grey to contrast all the black on the bike. Here is a non-artists rendering of what this might look like.

The orange I am thinking of on the other hand is a deep burnt orange that is best summed up by the Corvette color Atomic Orange as seen here.
The reason I included the shot of the vette is clear once you look at my non-artists rendering of the Ascot in orange... you have to imagine all the tangerine parts as the vette color above.

So the Atomic Orange would probably be harder to paint but is more unique and makes hte bike stand out a little better (read safety). However the grey is more subdued and would probably be cheaper (non metallic) and easier (non-metallic).
Since I probably won't do any paint work (prep yes paint hell no!) till the summer (read my posts about the paint booth, garage, smell etc) I have put up a poll open till the fourth of July asking what color it should be. Let me know. And I may (or not) use your advice.
Monday, February 23, 2009
Yes More!
I'm not going to blather on about it. Its late and I need to go to bed. I uploaded more pics to the picasa page starting here. In a nutshell I installed the radiator and worked on a broken off bolt in the frame (yes another). Only this time I was unsuccessful in my effort. I may just tap it as it sits and get a bolt to fit.
The nice thing about working in the garage when its in the 40s? Your beer stays cold no matter how slow you drink it!
Also since I have very little documentation on the interwebs as to who I am I decided to take a little something of me in my "attire"!

The nice thing about working in the garage when its in the 40s? Your beer stays cold no matter how slow you drink it!
Also since I have very little documentation on the interwebs as to who I am I decided to take a little something of me in my "attire"!
"I disappear for a couple days and you guys get all weepy?"
"Kara, you've been gone for over two months!" (Battlestar Galactica reference designed for 50% of my readership! And, approximate quote.)
I just posted my painting post when I looked back and realized how long its been since I last posted. Previous last post was November 24, 2008 and this latest post was February 23, 2009. Almost exactly three months. So I thought I would post again ( I know! I know!) about what happened in that two months.
Dec 08: Not much... got the motor torn down and discovered all the parts needed. Ordered them online. Then decided to tear down the rear head on the recomendation of the head shop guy (hehe) and added parts (for the rear) to my order. Snopocolyps 2008 happened and shot all my shipping to hell.
Jan 09: Finally got my parts mid January. I took small, infrequent opportunities to work on the motor. First step was get all the necassary parts for the head work (hehe) and get it all to the head shop (hehe). When I first talked with the guy he said he could probably do it in a day. When I finally got it to him his #2 shop guy (him being #1) had gone back to Mexico on vacation to see family. So he was backedup. It ended up being two weeks to get it done but he is a swell guy and did great work and was very helpful. As such I recomend him M&B Cylinder Heads. Not to mention the price was great. Originally quoted about $100 I went ahead and had him surface the heads for $40 extra. great work.
Feb 09: Putting it all back together. I took my time and again did an hour this day and an hour that. Finally got it all sealed up and decided to paint it. I painted the heads too, just blacked it out. Nice and glossy. I still haven't made up my mind on orange or deep grey for the tank and plastics but either way having two colors instead of three (black motor, polished heads, body color) it will just be black and color. Then I started the work on the frame. Most of that info is in the previous post.
That about sums it up. After assembly of what's torn down now all that remains is:
Required for road worthiness:
1. Fork Seals
2. Front brake pads
4. Replace brake and clutch levers (ordered)
5. Rebuild and install new(tome) master cylinder
6. Rebuilt license plate mount and lighting
Optional/Future:
1. Paint the tank and plastics
2. New/redone seat
3. Flashing brake light/additional brake lighting
4. Paint rear brake housing and rear springs
OMG - A NEW POST
Update: Well I don't know what I last posted but here is where it is... The motor is finished and I decided to paint it to look clean and new. As such I decided to go all black (the valve covers were polished grey) since I'm planning on painting the tank grey. I didn't want grey tank over grey-ish valve covers over black motor. A little too striped sounding. After painting the motor (which came out awesome) the frame was looking pretty beaten and battered.... soooooooo.... frame painting time!
I removed a bunch more stuff from the bike: tail cowl, rear fender, battery box, voltage regulator. All that remained was the airbox, coolant overflow tank, most cables and hoses, and the wiring harness. I pulled most of it up to the top of the frame and wrapped and taped the whole top section (see pics at picasa below). I decided it wasn't necessary to paint the upper parts of the frame since they were ing good shape and it's covered and out of site. Also because I didn't want to pull what remained.
At this point I decided to paint all the metal parts I removed. This included the kick-stand, center-stand, passenger peg supports, battery box parts and the foot peg parts. This would keep the bike looking more uniform when done. I set up a ridiculous paint booth up in the garage to try and minimize the over-spray on other stuff in the garage. I had planned on shooting it with the door open but by the time I was ready to do it (prep takes WAY longer than you think) the temp had dropped and was too cold to paint. So I reconfigured the setup for "garage door closed" operation. My little space heater could maintain the plastic box at about 65 degrees so it was good enough. The downside? ZERO VENTILATION! I had to run up to the store to get more paint (and a respirator) at 11:15 and was the last customer to leave the store. :-) When I got home Merry informed me that the entire house smelled like paint... BAD! I quickly shot the 3rd coat on and opened the garage door high enough to put a box fan exhausting out the front. (I showered and cleaned up for bed and then ran out and killed the fan and closed the door in my skivvies!).
Sunday was a nice day too so while the weather held off (it was supposed to rain) i pulled a big section of my paper floor in the driveway and prepped and painted the exhaust. I think I'm gonna like the way it looks! It's got scrapes and war wounds but they're painted scrapes and war wounds. So they look good-ish!
I shutdown for lunch and then when the kids were napping I did the impossible: I got the motor back in without a hernia OR scraping the newly painted frame and motor. That was a pretty impressive feat. When I removed the motor I commented that the manual was kind of over doing it with their suggested two people, recommended 3 for removal. I think they had installation in mind. Like any tinkerer knows, its a LOT easier to take something apart than to put it back together! What made me successful in my effort was something I normally don't do. I used patience and didn't start wailing on anything with a hammer! That's where I left till after bedtime to have some daddy time.
After the kids were in bed I went back out to the garage (through in my coveralls this time so I A: was warmer and B: felt like a guy that knew what he was doing. That last part was helpful since the procedure for the evening was: Surgery! One of the threaded frame mount points was broken off. So I ground it down and drilled it out. I then measured the tread count and size of the other bolts and tapped it to accept a M8 1.25TC (8mm diameter and 1.25 thread count [per mm i guess] YAY METRIC SYSTEM!) bolt. You'll get the idea in the pics and I'll post finished photos later. Needless to say it's important because this is the back side of the removable frame piece but they also function as the mount bolts for the right foot peg. Two times important! (Weak Flushed Away reference there)
After that I just got all the motor mount bolts in and tightened up the frame mounts then I moved over and re-installed the battery box. The little threaded shaft that holds it together (its two peices that wrap around the battery. Pivot on one side and bolt on the other holding the battery secure and to the frame.) was stripped and someone though it was good enough to drill a small hole in the stripped shaft and put a cotter pin in there. I wanted something a little more secure. I carefully cut off the stripped shaft and filed it flat. I then drilled a whole through it and tapped it to fit a spare small alen head bolt I had laying around. Its from a pre-drilled mount on a bike frame for a water bottle holder or pump. It was the perfect size and works well. This was the last act of the night.
Finally I just dropped all my tools and went inside. It was 11:30 or so. My hands are shot from working, getting dirty and washing once with Goop then with regular soap time and time again throughout the weekend. Okay that's all for now, I need some more lotion! (what a pansy). The pics will be up at Picasweb soon in the Ascot album. You'll just have to browse toward the end. I think they are time stamped so you can look for the pics from this weekend.
Update: Link to where new pics start-The Ascot Picasa Album
Subscribe to:
Posts (Atom)