Well after talking to the guy at the M+B machine shop I decided to pull the rear head too. First to ensure that everything is fine back there but also to have the whole system running optimally. The front head will have new seats and will be tight. For balance it makes sense to the same in the rear.
After removing the rear head everything looks fine. The piston has a small amount of carbon but not too bad. The valves and related gear look good. I had a personal/financial delema however in this process. I realized as soon as I pulled the rear head I'd just incurred some extra costs (head gasket) but there is the feeling of doing a job right and, for me in this case, that feeling was worth the extra $17 for a rear head gasket. But the decission was harder around whether to replace all the valve guide seals. They look fine and even the head guy at M+B seemed to think leaving them was okay... BUT! When's the next time I'm going to be inside this motor if ever? After staring at my cart in checkout for WAY TOO LONG I decided to do it right even though it's another $40. I'll feel better when its all done.
All told I have another $100 order for parts. The only saving grace on this one is that I may be able to combine it with my order from the weekend to save on shipping. It hasn't been processed yet... I don't think they open till Tuesday. Yay for saving $10.
This baby should purr like a kitten when she's all back together. I can't wait... I have a lot of ideas about phase 2 (basically cosmetic) but I'm trying to stay focused on where I am now.
Monday, November 24, 2008
Sunday, November 23, 2008
Total Tear Down!!!

Well I posted all my findings about loose valves and missing spring retainer parts and the consensus in the Ascot Yahoo group was to pull the head and take a look... pulling the head requires pulling the MOTOR!!! Saturday I set out on this adventure and it was a task. The main issue I figured I'd have is physically getting it out and in a workable position without dropping it or banging it around too much. The Clymer manual recommends 3 people but says 2 is doable. I lifted the engine fine by myself so I guess I'm as strong as 3 men? Sweet!
As expected the one unrestrained intake valve was hanging into the cylinder a bit. I'm going to take the head into a machine shop and have it redone. I'll probably have to replace the hanging valve. Also of note was the next suprise... there were some "nicks" or "dents" in the piston. See...

I don't think they are a major problem but I have no idea what got down in there. I'm going to clean them away from the cylinder walls and hope for the best. (there are many more close up shots in the rest of my picasa album.
One additional note... there is a reason people do motorcycle projects as "winter projects" or "summer projects"... it's because it takes so damn long to get parts. You never really know what you need till you start tearing things apart. When I bought this bike I figured a couple weeks of adjustments and clean up and she'd be good to go. Nope I have the motor out and apart... I'm going to be waiting two weeks for parts. I have no idea why it takes so long. Then I have to start putting it back together. In the mean time I'll get the fork seals done and the master cylinder that I bought of ebay installed.
Wednesday, November 19, 2008
Valves are not fun...
After going back and fourth from the Ascot Yahoo Group and my bike for several days trying to figure out why it won't run on two cyclinders I have it running.... but it makes a hell of a lot of noise... too much noise if you know what I mean.
What follows is from my post at the Ascot Yahoo Group
Well after much tinkering, pondering and bugging of Neil (thank you) I think the ignition is working fine. I got her to fire up tonight and both pipes got hot so she was firing on all two. Still making a lot of racket though. So, per Neil's advice I decided to make sure the valves were adjusted right. I pulled the little covers off the number one valve cover and noticed that there were little dings in the cover.... weird. Then I noticed there was no lock nut on one of the intake valves... And so here we go... pull stuff off to make room... pull off the valve cover and start to look around and I find the nut... then the metal ring that goes on top of the spring but I couldn't find the stay (little part that holds it all together on the valve stem). I hit the Clymer manual and it looks like I have to pull the head to get that all back together. This raises a couple questions.
1. Is there a way to get this all back together without pulling the head?
2. Does that passage that the cam chain comes up go all the way to the bottom of the crank case? I'm guessing the stay might have made the journey!
3. Is there any other damage I should be looking for resulting from the parts floating around? FWIW: The nut and ring were pretty nicely stashed out of the way. No scratches or dings to speak of.
One other interesting note. Not only did the idiot that last adjusted these not tighten the nut enough, the other cearances are ZERO!!! I couldn't cram my smallest feeler in them let alone 0.1mm. I pulled the covers on the rear and all the hardware is in place there. I'm hoping once I get all the valves corrected this baby should purr...
Pretty stupid of the previous owner. He probably had no manual and no idea what he was doing. I'm feeling pretty good that I'll have her up and running shortly though.
Here is the money shot:

More Pics as usual at my picasa page.
What follows is from my post at the Ascot Yahoo Group
Well after much tinkering, pondering and bugging of Neil (thank you) I think the ignition is working fine. I got her to fire up tonight and both pipes got hot so she was firing on all two. Still making a lot of racket though. So, per Neil's advice I decided to make sure the valves were adjusted right. I pulled the little covers off the number one valve cover and noticed that there were little dings in the cover.... weird. Then I noticed there was no lock nut on one of the intake valves... And so here we go... pull stuff off to make room... pull off the valve cover and start to look around and I find the nut... then the metal ring that goes on top of the spring but I couldn't find the stay (little part that holds it all together on the valve stem). I hit the Clymer manual and it looks like I have to pull the head to get that all back together. This raises a couple questions.
1. Is there a way to get this all back together without pulling the head?
2. Does that passage that the cam chain comes up go all the way to the bottom of the crank case? I'm guessing the stay might have made the journey!
3. Is there any other damage I should be looking for resulting from the parts floating around? FWIW: The nut and ring were pretty nicely stashed out of the way. No scratches or dings to speak of.
One other interesting note. Not only did the idiot that last adjusted these not tighten the nut enough, the other cearances are ZERO!!! I couldn't cram my smallest feeler in them let alone 0.1mm. I pulled the covers on the rear and all the hardware is in place there. I'm hoping once I get all the valves corrected this baby should purr...
Pretty stupid of the previous owner. He probably had no manual and no idea what he was doing. I'm feeling pretty good that I'll have her up and running shortly though.
Here is the money shot:
More Pics as usual at my picasa page.
Monday, November 10, 2008
Keeping Track of Costs
Well I have had the bike for a little over three weeks now. I've spent some money on blinkers and ordered parts for fixing up the carbs and fuel delivery (arived today by the way). So I figured it was time to add up the costs and see where we're at:
Thats not too bad but considering I haven't done much yet and it's not running I'm getting a bit concerned that I'm not going to meet my goal of $1000 up and running. Even worse I keep "finding" things I would like to get for it.
| Bike purchase | $480 |
| Ordered Parts (carbs) | $100 |
| Lights/Signals | $50 |
| Title/Tax | $80 |
| Fork Seals | $50 |
| Total so Far | $760 |
Thats not too bad but considering I haven't done much yet and it's not running I'm getting a bit concerned that I'm not going to meet my goal of $1000 up and running. Even worse I keep "finding" things I would like to get for it.
Sunday, November 9, 2008
Nothing New
Most of the parts I need should be in tomorrow so I'll be working on getting everything installed in the next week or so. Got lots of time this week since I only work one day this week! The only change since last post is that I bought at new flasher at NAPA Auto Parts. Generic, three contact unit that will have to be modded to work.
More next time.
More next time.
Monday, November 3, 2008
Blinkers Blink
Well the blinkers are up and running. I had to fabricate a longer stem for the new (smaller) front blinkers but it looks pretty good. It's not a stock look but I'm beginning to give up on the stock stuff. I've never been a restoration purist but I wanted a pretty stock machine. That was until I went out look for / buying replacement parts. The two pack of blinkers I bought were $25. The stock look blinkers (which were chrome instead of black) were $25 EACH SIDE. I'm cool with keeping costs down... and so is my wife!
Getting it all back together was a pretty interesting fight. I had repaired the speedometer but not yet installed it. So I had the blinkers, headlight and speedo to install. I first put the speedo back in place but it covers the mount bolts for the little metal brackets that hold the blinkers and headlight. So I had to pull it back off. This kind of thing went round and round for a while juggling parts. Finally got the headlight in and noticed it was crooked. Turns out a small tang that supports the previously mentioned "little metal brackets" was bent down slightly. Had to mess around with it very slowly and very carefully for a while to get it back in alignment. Once I did I started the parts installation dance again and eventually got everything back in a hooked up. When I tested everything.... no blink. I got it to blink after beating on the flasher relay a few times but it later stopped again. Looks like I'll have to replace that too.
Pics to come later.
Wednesday, October 29, 2008
The Signal For Good News
Well I think I have got my turn signals figured out. I looked into some options ranging from bold on LED signals, LED bulbs, aftermarket flashers you name it. All were expensive. I went to the motorcycle wrecker here and while they didn't have any used lights for me to dig through I did find a new pair of K&N Aluminum blinkers in a two pack for $25. The stock replacements were $25 per side and while these are smaller they are very bright. They don't have the stock mount but I've already started working something up using some aluminum tubing. I may change them out at some point but for now they will work well. The best part is they are three wire so I'll still have my front running lights and blinkers.
The best news is what I discovered in the back. It seems the rears were replaced (prior to my ownership) with the ones that I saw at the wrecker ($25 ea.) but they are the 3 wire version. So all I have to do to get rear running lights is run the wires from the front headlight bucket to the back. That's great. I'll get some pictures of my front signal mod when it's complete and post. I don't know if it will look cool but it will work.
Also while messing around I realized the the tail/brake light is pretty lack luster. I might add some brake light power. Not sure how right now but it's in my brain.
Speedo Fix Is Done
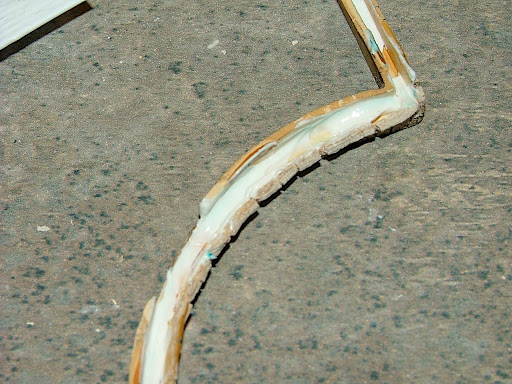
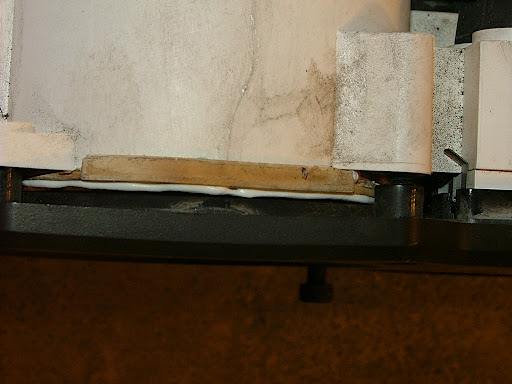
Well I got the speedo fixed up pretty nice. It's not like new but it will work and be much better off than it was. The first step was dis assembly which can be seen in the previous post. I got some good epoxy in the little double tube dispenser and it seems to be a pretty good bond. I also added a small amount of silicone caulk to both sides of the instrument display gasket since it was in pretty bad shape. I have a seal that I thing will be strong but still removable. Basically what remains of the original seal is serving as a template to hold the silicone in place.
The only glitch I had was that the speedometer needle broke while I was messing around with the back. Just a bit off the tip. I tried in vein to glue the little tip back on and gave up. I did have to bend the little metal pole the needed rests on at zero back a bit so the needle didn't go below zero. I'll still be able to tell how fast I'm going.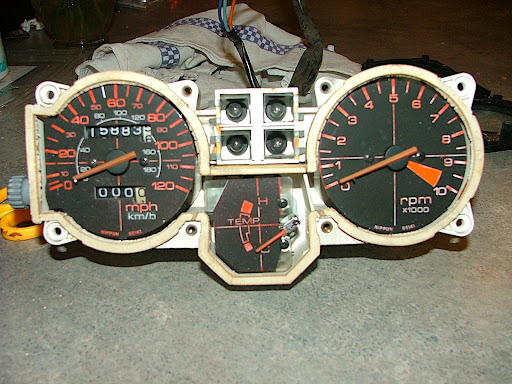
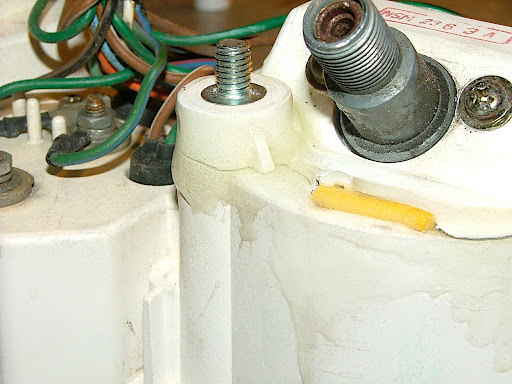
The epoxy fix to the cracked housing went better than I expected. The stud for the mount is glued on very well and I doubled up another layer of epoxy over it after the first layer dried. As I said I sealed up the front fascia and all seems well. I put the cover back on after cleaning up the pieces a bit and it looks pretty good... not new but pretty good. The yellow part you see is a small piece of craft foam (stolen from my daughter, sorry Aley) to fill the gap and the epoxy is double layered over it.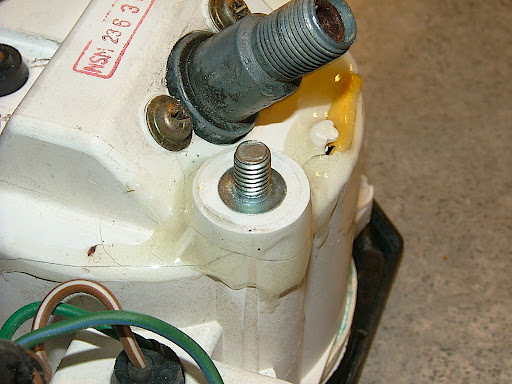
More pics can be found at my picasa page.
NOTE: if you notice a slight green tinge to the silicone its because I was using a previously painted popsicle stick to push it around the inside of the gasket. :-)
Sunday, October 26, 2008
Mild Update
I didn't do and substantive work today but took pictures of several things that need work. I'll post some here but the rest will be in my Picasa Page.
First we see the extent of the damage to the speedometer. The housing is cracked all the way around and the spot where the mounting bolt goes is totally ripped out. I'm going to try to epoxy it all back together in a way that doesn't look too crappy.

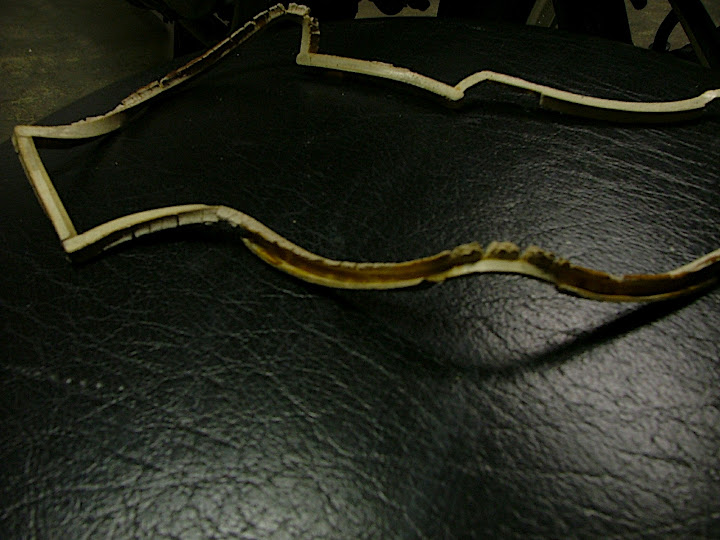
When it comes time to reasemble all the speedo parts I'm going to have to come up with a new way to seal it all up. The gasket that seals the front facia (with the windows for the guages) to the house is shot. Creativity will have to reign as I'm postive there isn't a replacement part for this.
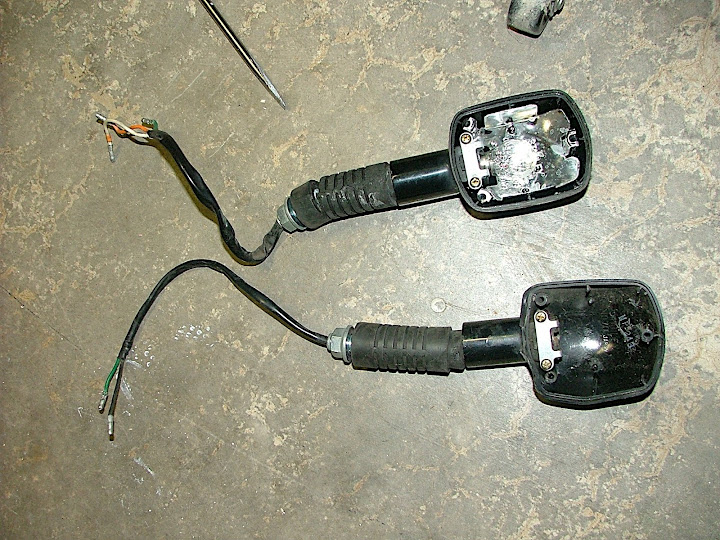
Also interesting is the blinker situation. I posted before about getting the lighting situation working properly. I will have to replace the front two signals however. I may replace all the way around with LED though. Either way it's interesting that one front signal was two wire (Just blinks when turning) and the other was three wire (running light and blinker).
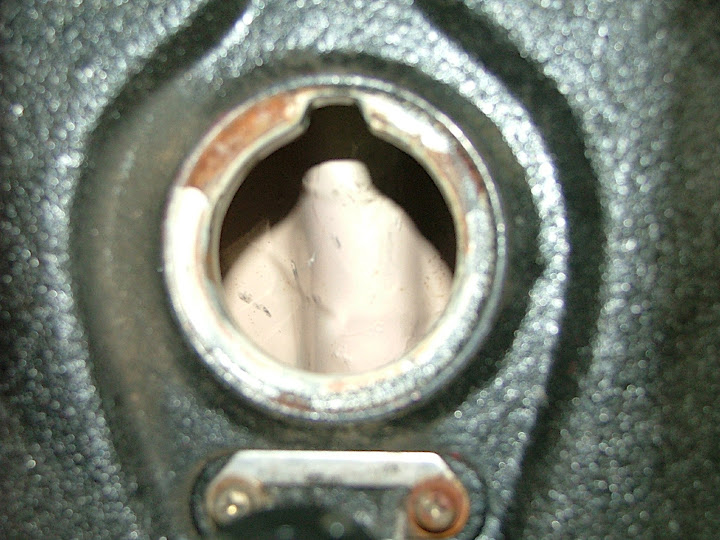
Lastly the tank has been kreemed or similar. I'm still not totally up on the tank treatments but it's obvious something has been done here. I'll need a mirror to inspect more closely but so far I'm not sure if this is a good or bad thing.
There are some more shots at the picasa page.
First we see the extent of the damage to the speedometer. The housing is cracked all the way around and the spot where the mounting bolt goes is totally ripped out. I'm going to try to epoxy it all back together in a way that doesn't look too crappy.
When it comes time to reasemble all the speedo parts I'm going to have to come up with a new way to seal it all up. The gasket that seals the front facia (with the windows for the guages) to the house is shot. Creativity will have to reign as I'm postive there isn't a replacement part for this.
Also interesting is the blinker situation. I posted before about getting the lighting situation working properly. I will have to replace the front two signals however. I may replace all the way around with LED though. Either way it's interesting that one front signal was two wire (Just blinks when turning) and the other was three wire (running light and blinker).
Lastly the tank has been kreemed or similar. I'm still not totally up on the tank treatments but it's obvious something has been done here. I'll need a mirror to inspect more closely but so far I'm not sure if this is a good or bad thing.
There are some more shots at the picasa page.
Friday, October 24, 2008
Day One of Digging In
Well tonight was my first night getting in and digging around. Seeing what works and what doesn't. This evening is a good news bad news story. First the good news...
I knew the front two turn signals were broken so I was kind of ready to replace them. I though I'd be able to rig them to last a little while but they are toast. Also only one (front left) lit up. No blinking no running lights... It's good news because after messing around with my test light for a while I got the blinkers working and figured out all the lighting issues. My main issue was the fuse box. Corrosion had built up between the fuse seats and the fuses. I just cleaned them all up with some mild sand paper and everything started working. The flasher relay was a little hesitant to work at first but after switching back and fourth for a while it started working fine. Been sitting a while.
The bad news. I had to pull the front headlight to get at the wiring and mounts for the turn signals. One of the first things I noticed when sitting on the bike is that the instruments seemed crooked and they moved a bit more than I thought they should. Since the back was exposed I decided to poke around. I found the problem... the back side of the speedometer is cracked... BAD! Everything seems to be working but that will have to be fixed. I began to disassemble as I went trying to get the instrument cluster off the bike. Once I did I removed the face glass and it pulled and stretched a very nasty gasket that was ready to fall to pieces. The plan will be to try to glue the crack and get everything back in working order. The hardest part will be getting it sealed up again since the gasket is toast.
Also pulled the tank and drained all the old gas. Looks like the tank has been coated/sealed inside and it looks like a home kit. :-) I removed the petcock and will clean it out later. I had to mangle the inlet screen because it was jammed in the hole due to the fact that the sealer had reduced the ID of the tube everything mounts too.
Upcoming Costs Confirmed:
New Petcock inlet screen and seal.
Two new front turn signal assemblies.
Epoxy!
Potential Costs:
New speedo/instrument cluster
New flasher
New petcock or rebuild kit
Wednesday, October 22, 2008
Everything is on the Internets
I found this link via the good folks in the AscotVT500Enthusiasts group on yahoo.com. It's a great run down on how to do the job with great pictures.
Maybe this weekend I'll get some time to start working on it.
I think I'll do the forks first. I have the seals in hand though I was going to return them because I realized the most expensive way is to buy at the dealer. It was true in this case to. They are online for $16 each side (genuine Honda) instead of the $26 I paid for each. But when you through in shipping and the restocking fee the dealer will hit me with (plus gas, inconvenience etc) it will be about the same cost. So in the future I'll buys stuff online. I already have a wish list up at cyclepartswarehouse.com. Nice way to track down everything you need in once place and have an overview to total cost etc. Also they have all the exploded views of the entire bike. NICE!

Tuesday, October 21, 2008
Run down of the "To Do" list
There is plenty of work needed to get this bike up and running. In my mind it's all to be broken out into a priority list. I'm kind of using this post as my own notes so it's not going to be compelling reading.
Priority 1-ASAP: What needs to happen to get her on the road.
Priority 2-After 1: Comfort/Ride-ability/Tuning
Priority 3-Over time/when available: Cosmetic/Preferential Mods
I know this seems like a lot but I'm actually looking forward to this as a project. I just have to fit it in to my schedule at home. I don't want to take too much time away from the fam. After all one of the justifications for this motorcycle in the first place is to have MORE time with the fam.
Priority 1-ASAP: What needs to happen to get her on the road.
- Old fuel drained from the system
- Petcock cleaned/rebuilt
- Carburetors cleaned/rebuilt
- Fork Seals replaced
- Front brake pads replaced (oily from failed fork seals)
- Standard tune up stuff (plugs, oil/filter, coolant, rear end, air cleaner, etc)
- Turn signals need some troubleshooting (no work-y) Probably start as duct tape solution
- Maybe battery - I charged it up and it seemed to hold but cranks pretty slow
Priority 2-After 1: Comfort/Ride-ability/Tuning
- Check out suspension in rear (assume front will be okay)
- Look into seat replacement/repair/recover/something
- More permanent turn signal solution (replacement/mod)
- Look at instrument situation (they are kinda tweaked a bit)
- Lube stuff: kickstand, center stand, cables etc.
- Replace broken (not too bad) clutch lever
Priority 3-Over time/when available: Cosmetic/Preferential Mods
- Take a stab at getting the rhino coating off panels and tank and repaint. (replace?)
- Touch up paint in areas
- Polish stuff that should shine
- Add a rack or trunk
- Windshield
I know this seems like a lot but I'm actually looking forward to this as a project. I just have to fit it in to my schedule at home. I don't want to take too much time away from the fam. After all one of the justifications for this motorcycle in the first place is to have MORE time with the fam.
Sunday, October 19, 2008
Why this bike
I figured I would post a quickie about my selection and how this evolved.
The first aspect that led to this is that I switched my schedule to 4/10s (four, ten hour days). The afternoon commute was taking about an hour to go 17 miles. Leaving at 4:30 puts me home at 5:30. Dinner, baths... not a lot of time with the kids. Plus gas and the DREAD of traffic. Motorcycle = carpool lane, efficiency and fun. I estimate my commute will be a half an hour or so.
There are a lot of different style bikes. What I wanted was a cheap, efficient, neutral ergonomics (not a crotch rocket, not at cruiser), nimble and decent looking motorcycle that had just enough cool that I could live with it. Maintenance comes into the issue to. I didn't want to go to old and have a bike that needs adjustments and manual lubing all the time.
When this bike first showed up on craigslist I passed it by a couple times because it didn't resonate with me. Then I started getting a bit frustrated with what was available in the $500 range. Way old bikes, bikes missing parts bikes needing lots of work etc. I ended up back at this bike and googled it. Good gas mileage, shaft drive (very low maintenance), V twin motor (lower RPM running), 6 speed tranny (mileage), small package etc etc. The more I looked into this sort of odd bike the more it seemed ideal to my needs.
I finally got in touch with the guy and he agreed to show it to me on Satruday. I ended up taking the kids and Merry and I realized I'd have to trailer it home... oh and it was longer than my trailer. SOooooo I rigged up a little extention for my trailer to hold the bike. And with only one stop on the route to check straps we got it home.
The asking price was $500 but I drive a pretty hard bargain and whittled him down to $480. He didn't know what hit him. I'd like to ride as soon as possible but the truth is the bike doesn't run and needs some TLC to be road worthy. I'll cover the work ahead in the next post.
First Post
Well here it is... another blog for the guy that... uh... n-e-v-e-r blogs. I'm really gonna try this time:-)
Okay so this one is different. This blog will focus on a new motorcycle I just bought. A 1984 Honda VT500FT Ascot. The bike has sat for a while and is not running. It's also been a little beat up, and in my opinion, mistreated over the years. This will be a slow process to renew this bike back to a solid, stock-like bike. I don't have a budget to just go blow a bunch of cash on it in a whirlwind project. If I did I would have simply bought a better one. Instead this will be a prioritized project of baby steps that will lead to a functioning motorcycle first then slowly improve the bike over time. I'll try to document it all here for fun and posterity. Should be fun.
Without further ado here is the beast:

Current status is a non-functioning attempted rat bike conversion. First order of business will be to fix the "non-functioning" part. I guess the real first step is cleaning out the garage to get it in there. More on that next time.
Subscribe to:
Posts (Atom)